Why Bounding Box Annotation is Crucial: A Comprehensive Guide
Snehal Joshi
June 18th, 202410 min read
Bounding box annotation is a fundamental step in creating image training data for AI and ML. This guide explains its different types, how to perform it, the associated challenges, and how to select the right bounding box.
Bounding boxes are probably the oldest and most commonly used image annotation technique. They involve drawing oriented, cuboid, or rectangular 2D bounding boxes carefully around objects within images or videos.
Annotated bounding boxes help object detection models identify objects of interest in an image, and where they are located within a scene. Furthermore, labeling, and tagging provide information to the AI about those objects and their inter-relationships.
As the demand for computer vision applications keeps growing, the need for efficient and scalable data annotation methods becomes increasingly critical. Manual annotation, while accurate, can be time-consuming and expensive. Here, bounding box annotation, with accurate box placement, offers a practical way for faster image labeling while maintaining high quality.
In this comprehensive guide, we examine the role of bounding box annotation in AI training data, the types of bounding boxes used for computer vision models, and discuss the challenges, tools, and techniques for efficient annotation.
The importnce of bounding box annotation
Bounding box annotation provides essential data for machine learning models and helps train algorithms to recognize and classify objects in computer vision tasks, based on their spatial features. These make it possible for AI and ML computer vision models to perform accurate and efficient object recognition.
Bounding boxes are important for:
AI training data: They provide labeled visual examples that teach computer vision models to identify and locate specific objects.
Image labeling and search: Annotated images form the backbone of accurate image tagging systems, which enable specificity in image search and categorization capabilities.
Semantic understanding: Bounding boxes identify different objects within an image, facilitating deeper scene analysis and interpretation.
To understand this better, let’s consider the following table showing how bounding boxes enable corresponding capabilities in object detection models:
Bounding Boxes
Object Detection Models
Define location and size of objects
Improve identification and classification accuracy
Serve as training data
Enhance model precision and reliability
Help in model evaluation
Aid in improving model performance
Hitech BPO helped a Swiss food waste assessment company by annotating images of kitchen waste and food items to train machine learning models. The process involved segmentation, labeling, auditing, and review to ensure accurate data.
Bounding box annotation was used to label areas of interest in the images, helping the machine learning models accurately interpret visual information related to various food items and wastes.
Understanding the different types of bounding boxes and when to use them are essential for building effective computer vision models.
Here are some common types of bounding boxes and their uses:
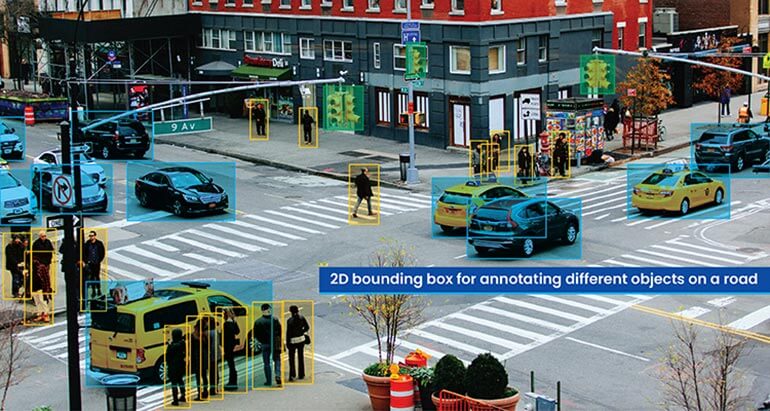
2D axis-aligned bounding boxes
The 2D bounding box is the most widely used annotation type.
These are the simplest type, where the sides of the bounding box are aligned with the axes of the coordinate system. This type is efficient for basic object detection, where objects are roughly orthogonal or aligned with the axes.
To create a 2D bounding box, a simple rectangle is drawn around an object in a flat image and repeated for all objects of interest. Each box is defined by the coordinates of its top-left and bottom-right corners.
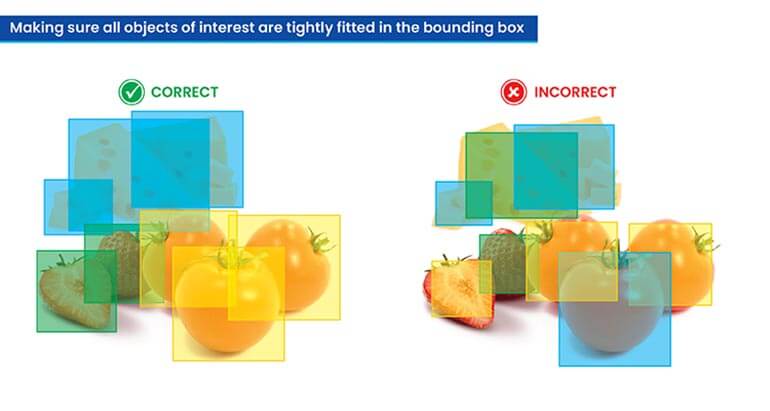
Tips to correctly draw 2D bounding boxes
Enclose the entire object tightly, touching its outermost pixels.
Exclude unnecessary background
Align edges precisely with the object’s visible boundaries.
Maintain consistency in annotation style across the dataset.
Application
Retail: Identifying and counting products on shelves for inventory management.
Healthcare: Identifying organs, tumors, or other abnormalities in X-rays, CT scans, or MRIs.
Manufacturing: Locating parts on conveyor belts for assembly.
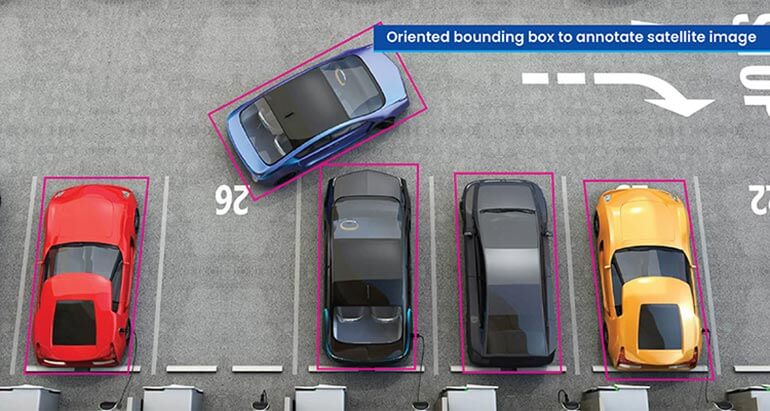
Oriented bounding boxes
This annotation type is used when the objects in the images are not properly aligned with the horizontal and vertical axes.
The boxes are rotated to match the precise angles of the objects, enabling a tighter fit around their actual shapes. In addition to the standard coordinates, rotated bounding boxes require an angle parameter or additional corner points to define their rotation.
Tips to correctly draw oriented bounding boxes
Align the box’s axes with the object’s principal orientation.
Ensure the box corners accurately represent the object’s extremities.
Clearly indicate the length, width, and angle of rotation.
Maintain close fit around the object’s rotated boundaries.
Application
Aerial and satellite imagery: Help to identify and annotate buildings, ships, and vehicles seen from above and from various angles.
Text detection: Rotated boxes are used for enclosing text lines that aren’t perfectly horizontal.
Manufacturing defects: Help to detect flaws in parts that are oriented at specific angles.
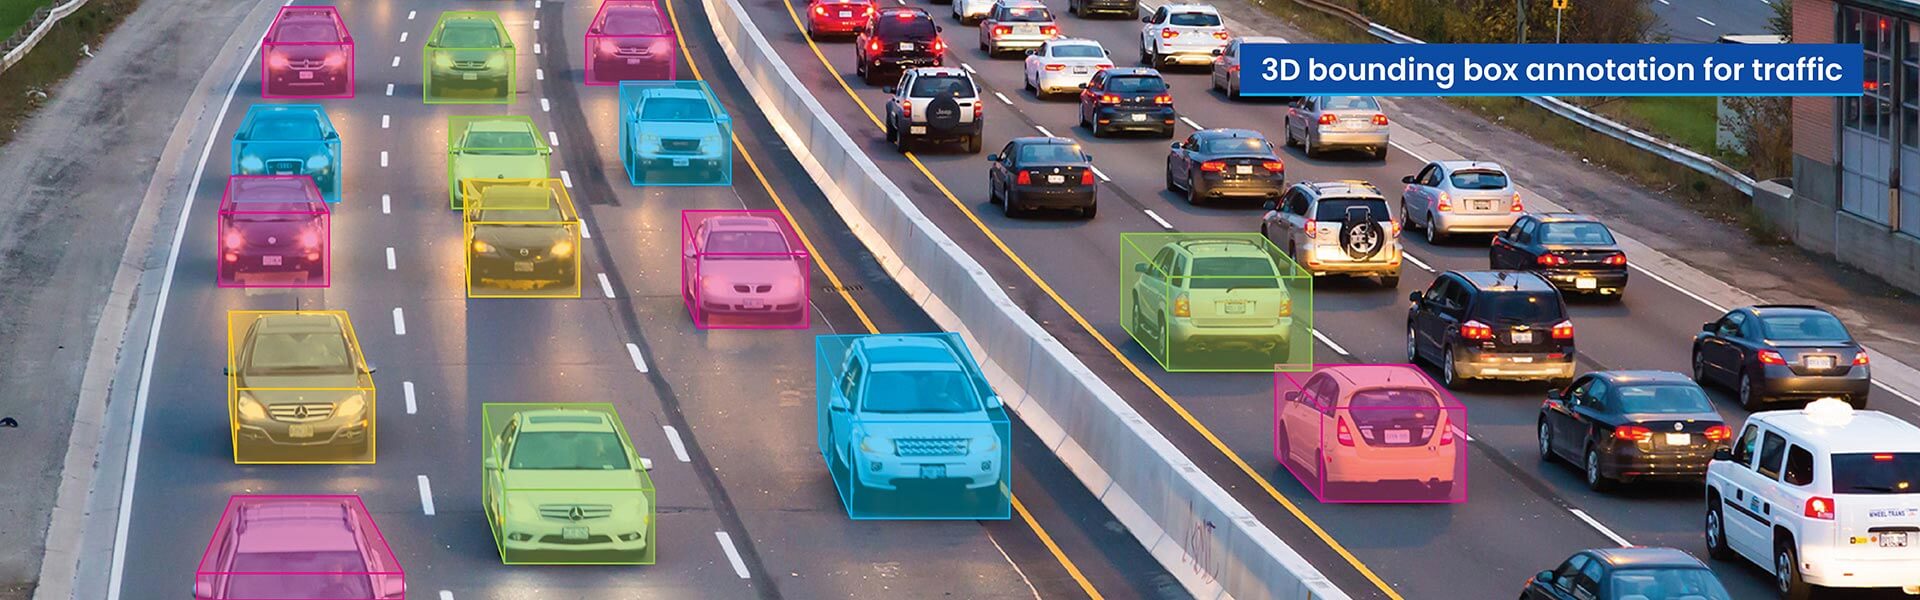
3D bounding boxes
3D bounding boxes help computer vision applications understand depth.
These boxes are rectangular cuboids marked with length, width, and height dimensions. 3D bounding box annotation requires either specialized 3D sensor data (like LiDAR point clouds) or multiple images of a scene from different viewpoints.
Tips to correctly draw oriented bounding boxes
Accurately position the cuboid in a 3D space relative to the object.
Match the cuboid’s dimensions to the object’s length, width, and height.
Align the cuboid’s axes with the object’s 3D orientation.
Ensure the cuboid encompasses all visible parts of the object.
Application
Self-driving cars: Help to detect other vehicles, pedestrians, and obstacles accurately in 3D.
Robotics: Help robot manipulation with understanding of objects and their surroundings in 3D.
Augmented reality: Help to place virtual objects realistically within a 3D environment.
Hitech BPO annotated live traffic video streams for road planning and traffic management for a data analytics company in San José’s, CA. Vehicle images were labeled by type, direction, and movement using bounding box annotation to train machine learning models for predicting traffic issues, counting vehicles, and managing congestion. This resulted in better traffic flow and safety improvements.
Some challenges faced when doing bounding box annotation
AI and ML companies face multiple challenges when annotating image objects with bounding boxes for training their models:
Data quality and consistency: It is difficult to maintain a balance between tightness and coverage of objects with bounding boxes, and at the same time ensure a standardized approach. However, without this, model performance is affected by inconsistent labeling.
Complexity and variability of objects: Variations in size, shape, and orientation of objects complicate the annotation process. It is easy to overestimate or underestimate an object’s perimeter if solely relying on rectangular bounding boxes. Annotation types should always be object/shape specific, but it is not uncommon for annotators to make the wrong choice.
Occlusion and overlapping: Annotating objects that are partially hidden (occluded) or overlapping is challenging. Accurate annotation in such scenarios requires using separate labels or flags to indicate partial occlusion. Each overlapping object should typically have its own bounding box, especially if it belongs to different classes.
Ambiguous boundaries: Deciding where to draw the line for objects with unclear edges, such as smoke, hair, or shadows, is another challenge. Clear guidelines on handling fuzzy edges, whether to include or exclude them in the box, are important for precise annotation in such cases.
Addressing and overcoming these challenges when doing bounding box annotation requires a clear understanding of the different types of bounding boxes and when to choose which one.
How to carry out bounding box annotation
Creating a bounding box for computer vision isn’t simply about drawing boxes – it involves careful planning, the right tools, and attention to detail.
Creating high-quality bounding boxes involves the following steps:
Step 1: Preparation
Defining the goals: A clear outline of the desired outcome of our object detection model and specific objects of interest is necessary. Here, we also define the exact classes for object detection (e.g., car, person, bicycle).
Image collection: We assemble a diverse dataset of images that represent the real-world scenarios that our AI model will encounter. It is important to consider variations in lighting, object angles, background complexity, and potential occlusions.
Annotation guidelines: Next, we define clear guidelines for how to draw boxes, handle edge cases (like partial occlusions), and label objects consistently. This is essential for maintaining a high standard of quality across multiple annotators working on the project.
Step 2: Choosing the right annotation tool
While selecting the right tool for bounding box annotation, the following factors must be kept in mind:
Features: The tool must support the specific annotation types we need (2D, 3D, rotated bounding boxes).
Collaboration: The tool should allow multiple annotators to work simultaneously on a project. It must offer features for task assignment, version control, and communication within the platform.
Scalability: It should have the capacity to handle the volume and complexity of our datasets.
Format Support: We must ensure that the tool can handle different image formats and export annotated data in a format compatible with the target machine learning frameworks (e.g., PASCAL VOC, COCO, YOLO).
Step 3: Drawing the box
Loading the image: First, we select an image from our dataset to start annotating.
Selecting the object class: Next, we choose the appropriate label for the object we want to annotate from our pre-defined list.
Choosing the right type of bounding box: We consider the complexity, alignment, and level of detail required for each object to select the bounding box type.
Drawing the bounding box: Many tools use a click-and-drag interface to define the box’s corners. The box should be drawn ensuring the closest fit of the entire area of interest.
Adjust and refine: We use zoom features and fine-grained controls to ensure that our box aligns as closely as possible with the object’s edges.
Repeat: These steps are repeated to ensure that all relevant objects within the image are annotated according to the predefined guidelines.
Step 4: Quality control
Rigorous quality control is essential to ensure the integrity of annotated data. Here are some practices that we follow:
Double checks: We implement a review process by different annotators or domain experts to catch errors or inconsistencies.
Automated validation: Some tools offer built-in checks for issues like empty bounding boxes or incorrect labels.
Iterative refinement: We use information from the reviews and annotation guidelines to iteratively update the process to address common errors and improve overall quality.
Choosing the right bounding box type
Choosing the right bounding box type saves the object detection model from inaccurate predictions and “false positives” detections.
Here are some bounding box annotation tips for making the right choice:
1. Consider object shape and orientation
If the objects are mostly rectangular and aligned with the image frame, 2D bounding boxes will be appropriate.
If objects frequently appear rotated or at unusual angles, oriented bounding boxes will provide a more accurate representation.
If it is important to understand object dimensions, volume, or their 3D position in space, cuboid bounding boxes are necessary.
2. Balance precision and complexity
Defining class for each bounding box offers the most detail, but it’s also more labor-intensive to annotate.
If precise object location is the primary goal, 2D, or oriented bounding boxes are a more effective choice.
3. Factor in the model’s requirements
We must also ensure the chosen bounding box type is compatible with the model’s architecture.
4. Start simple, iterate as needed
We often begin with simple 2D bounding boxes. If the model’s performance isn’t satisfactory, we review and upgrade to oriented bounding boxes or 3D cuboids for greater precision.
Tools for bounding box annotation
The right tools can simplify your bounding box annotation workflow, saving you time and ensuring accuracy in the results. Several image annotation tools are available in the market for creating and managing bounding box annotation, each with its set of unique features.
Here’s an overview of a few such tools:
Computer Vision Annotation Tool (CVAT) is an open-source, web-based tool that supports a wide range of annotation formats, including images, videos, 2D boxes, OBBs, 3D cuboids, polygons, points, and lines. It offers semiautomated annotation features with strong community support.
Visual Object Tagging Tool (VOTT) is an open-source tool designed for easy use and cross-platform compatibility. It supports images, videos, and 2D boxes, making it a user-friendly choice for basic annotation tasks.
LabelImg is made using Python and focuses on simplicity and speed, supporting images, and 2D boxes. It is ideal for basic annotation needs due to its straightforward and fast operation.
SuperAnnotate is a commercial, web-based tool that accommodates a wide range of annotation formats for images and videos. It excels with project management features, collaboration tools, and AI-assisted labeling, making it suitable for complex annotation projects.
Labelbox is another commercial web-based tool similar to SuperAnnotate in its support for various annotation formats. It stands out with its comprehensive features and quality control tools, ensuring high standards of annotation quality.
The role of human annotation expertise
While automation and AI assistance can boost efficiency, human annotators excel at judging, interpreting, and handling edge cases. Also, human annotators can better understand the context of images to make informed decisions during labeling.
The most effective approach, thus, involves a combination of tools and human expertise, while carefully considering factors such as complexity of project, the size of dataset, and the level of collaboration required.
Conclusion
Now that you have an idea of what bounding boxes are all about, know that they have wide uses in machine learning and AI and are used through various approaches, each with its unique advantages. For instance, the You Only Look Once (YOLO) framework is used for efficient object detection, using bounding box encoding and Intersection over Union (IoU) to identify objects.
However, whatever the framework or algorithm used, the basic bounding box annotation types remain the same, as discussed here.
Bounding box annotation is crucial for object detection and recognition. Understanding how to accurately annotate with bounding boxes will enhance the quality of training data. Keeping them clear, concise, and accurate will help your computer vision models perform reliably in real-life applications.
Get exceptional training data sets for your machine learning models and AI.
Snehal Joshi spearheads the business process management vertical at Hitech BPO, an integrated data and digital solutions company. Over the last 20 years, he has successfully built and managed a diverse portfolio spanning more than 40 solutions across data processing management, research and analysis and image intelligence. Snehal drives innovation and digitalization across functions, empowering organizations to unlock and unleash the hidden potential of their data.
What’s next? Message us a brief description of your project. Our experts will review and get back to you within one business day with free consultation for successful implementation.
Disclaimer:
HitechDigital Solutions LLP and Hitech BPO will never ask for money or commission to offer jobs or projects. In the event you are contacted by any person with job offer in our companies, please reach out to us at info@hitechbpo.com
To provide the best experiences, we use technologies like cookies to store and/or access device information. Consenting to these technologies will allow us to process data such as browsing behavior or unique IDs on this site. Not consenting or withdrawing consent, may adversely affect certain features and functions.
Functional
Always active
The technical storage or access is strictly necessary for the legitimate purpose of enabling the use of a specific service explicitly requested by the subscriber or user, or for the sole purpose of carrying out the transmission of a communication over an electronic communications network.
Preferences
The technical storage or access is necessary for the legitimate purpose of storing preferences that are not requested by the subscriber or user.
Statistics
The technical storage or access that is used exclusively for statistical purposes.The technical storage or access that is used exclusively for anonymous statistical purposes. Without a subpoena, voluntary compliance on the part of your Internet Service Provider, or additional records from a third party, information stored or retrieved for this purpose alone cannot usually be used to identify you.
Marketing
The technical storage or access is required to create user profiles to send advertising, or to track the user on a website or across several websites for similar marketing purposes.